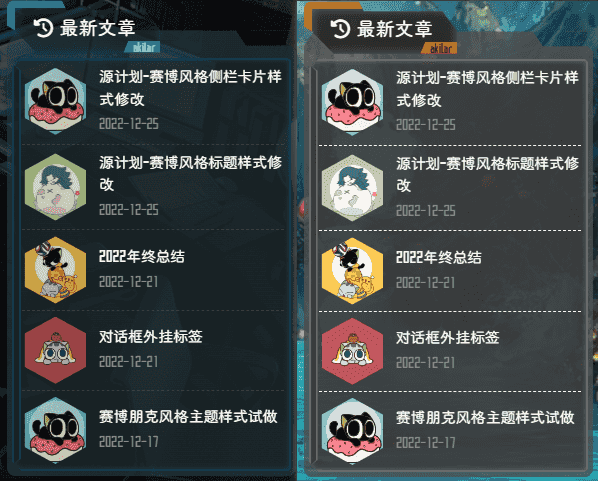
点击查看更新记录
更新记录
2023-01-17:小结内容新增
- 不再依赖渐变色背景。而是直接去切割before或者after伪类。这样不会影响正文版块。
2023-01-16:调整角标样式
- 为了适配fixed-card-widget的功能。将卡片标题定位类型改为sticky
2022-12-25:内测版
- 尝试用渐变背景色挖出透明版块
- 通过box-shadow的inset做出光晕边框效果
- 以镂空方式镶嵌标题
点击查看参考教程
| 参考方向 | 教程原贴 |
|---|---|
| 参考了UI风格和配色样式 | Neon-Space-Rainmeter |
| 参考了UI风格和配色样式 | JARVIS-Highpitched-OS |
| fontawesome图标文档 | fontawesome |
| Flex布局参数解释 | Flex 布局教程:语法篇 - 阮一峰的网络日志 |
| Transition属性实现平滑过渡动画 | CSS3实现伪类hover离开时平滑过渡效果示例 |
| CSS伪类实现三角形绘制 | 纯CSS 实现绘制各种三角形(各种角度) - saucxs - 博客园 |
| 使用clip-path实现多边形剪裁。 | 不可思议的CSS之clip-path |
| 通过径向渐变绘制多边形 | 10个demo示例学会CSS3 radial-gradient径向渐变 |
预览效果
点击查看预览效果
使用须知
本项目目前还是内测状态,样式优先考虑与本站的兼容,对于默认主题的兼容性适配暂时延后。一切以将本站装点完成为最优先事项。
因为侧栏卡片每个卡片的版块class和id都不尽相同。没法通过一个class来控制每种卡片。所以我只能遇到一个适配一个。
我会尽量在注释中给出适配方向。所以没有前端基础的慎用。我暂时没有更多的精力去适配其他我用不到的卡片。
魔改步骤
- 新建
[Blogroot]\themes\butterfly\source\css\_layout\ark_card_weiget.styl,若是之前有用过试做版的,请覆盖该文件。两者不兼容。1
2
3
4
5
6
7
8
9
10
11
12
13
14
15
16
17
18
19
20
21
22
23
24
25
26
27
28
29
30
31
32
33
34
35
36
37
38
39
40
41
42
43
44
45
46
47
48
49
50
51
52
53
54
55
56
57
58
59
60
61
62
63
64
65
66
67
68
69
70
71
72
73
74
75
76
77
78
79
80
81
82
83
84
85
86
87
88
89
90
91
92
93
94
95
96
97
98
99
100
101
102
103
104
105
106
107
108
109
110
111
112
113
114
115
116//default color:
:root
--card-widget-background: rgba(80, 80, 80, 0.8) //卡片整体背景色
--card-widget-color: #ffffff //卡片字体颜色
--card-widget-content-background: rgba(50, 50, 50, 0.6) //内容版块背景色
--card-widget-content-border: rgba(117, 118, 120,0.8) //内容版块边框颜色
--card-widget-title-background: rgba(40, 40, 40,0.95) //卡片标题背景色
--card-widget-title-color: #ffffff //卡片标题字体颜色
--card-widget-title-corner-background: #be7321 //卡片角标背景色
--card-widget-title-corner-color: rgba(40, 40, 40,0.9) //卡片角标字体颜色
[data-theme="dark"]
--card-widget-background: rgba(39, 66, 69,0.6)
--card-widget-color: #ffffff
--card-widget-content-background: rgba(23, 25, 27, 0.5)
--card-widget-content-border: rgba(0,78,119, 0.5)
--card-widget-title-background: rgba(10, 17, 35, 0.5)
--card-widget-title-color: #004e77
--card-widget-title-corner-background: #37708f
--card-widget-title-corner-color: #92cef1
//内部版块样式,因为侧栏卡片内部的id,class不统一,所以单独写成一个方法,方便下面调用
ark_card_widget_content()
position: relative
margin: 25px 5px 5px 5px
background: var(--card-widget-content-background)
padding: 5px 5px 5px 8px
border: 2px solid var(--card-widget-content-border)
border-top-right-radius: 3px
border-top-left-radius: 10px
border-bottom-right-radius: 3px
border-bottom-left-radius: 10px
clip-path: polygon(0 10px, 10px 0, calc(100% - 3px) 0, 100% 3px, 100% calc(100% - 3px), calc(100% - 3px) 100%, 10px 100%, 0 calc(100% - 10px))
box-shadow: 0 0 5px var(--card-widget-content-border) inset
&:not(.card-friend-link-container) //这个是用来排除不需要的卡片类的
&::before //内容版块左边的凹线装饰
content: ""
width: 0px
height: calc(100% - 20px)
position: absolute
left: 0
top: 5px
background: var(--card-widget-content-background)
border-top: 5px solid var(--card-widget-content-border)
border-right: 5px solid var(--card-widget-content-border)
border-bottom: 5px solid var(--card-widget-content-border)
border-left: 5px solid transparent
clip-path: polygon(0 0,7px 5px,7px calc(100% - 5px), 0 100%)
.card-widget
&:not(.card-info)
font-family: 'SAOUI','ZhuZiAYuanJWD' //字体样式,可以自行替换
background: linear-gradient(to bottom,transparent 30px,var(--card-widget-background) 31px,var(--card-widget-background))
padding: 0px
clip-path: polygon(0 0,100% 0,100% 30px,calc(100% - 60px) 30px,calc(100% - 50px) 45px,calc(100% - 5px) 45px,100% 50px,100% calc(100% - 5px),calc(100% - 5px) 100%,5px 100%,0 calc(100% - 5px),0 45px,10px 30px,0 30px)
.item-headline
border-top: 8px solid var(--card-widget-title-corner-background)
border-left: 8px solid var(--card-widget-title-corner-background)
box-shadow: 0px 0px 10px var(--card-widget-content-border) inset
border-top-left-radius: 3px
border-top-right-radius: 20px
border-bottom-right-radius: 3px
border-bottom-left-radius: 20px
background: var(--card-widget-title-background)
color: var(--card-widget-color)
min-width: 8em
width: fit-content
clip-path: polygon(0 0,55px 0,60px 10px,calc(100% - 15px) 10px,100% 30px,100% 100%,30px 100%,8px 30px,0 25px)
padding: 0px 1em 0px 1em
margin: 0px 0px -20px 0px
position: sticky
top: 0px
left: 10px
&:after
content: "测试"
position: absolute
bottom: 0
font-size: 12px
display: block
right: 0
line-height: 1em
color: var(--card-widget-title-corner-color)
width: fit-content
height: 1em
padding: 0 5px 0 10px
background: var(--card-widget-title-corner-background)
clip-path: polygon(5px 0,100% 0,100% 100%,0 100%)
//以下是针对不同卡片的单独样式兼容性适配
//读者可以仿照以下内容对卡片的内容版块套上边框和调整字体颜色
&#card-toc //目录百分比样式适配
.toc-percentage
position: absolute
margin: -7px 0px 0px 10px
font-size: 26px
.toc-content
ark_card_widget_content()
.toc-link
color: var(--card-widget-color) //覆盖目录默认字体颜色
.card-friend-link-container //友链通讯录内容版块样式适配
ark_card_widget_content()
.aside-list //最新文章,相关文章,最新评论内容版块适配
ark_card_widget_content()
.aside-list-item
.thumbnail
img
clip-path: polygon(50% 0%,95.5% 25%,95.5% 75%,50% 100%,4.5% 75%,4.5% 25%) //头像框六边形切割
.content
.title
color: var(--card-widget-color) //覆盖最新文章默认字体颜色
.comment
color: var(--card-widget-color) //覆盖最新评论默认字体颜色
.card-tag-cloud //标签卡片内容版块适配
ark_card_widget_content()
.webinfo //网站信息卡片内容版块适配
ark_card_widget_content()
.webinfo-item
color: var(--card-widget-color) //覆盖网站信息卡片默认字体颜色
小结
这次的设计尝试解决了一下之前遇到的clip-path切割后默认自带overflow:hidden的问题。通过渐变色属性linear-gradient(to bottom,transparent 30px,color 31px,color)切割出一段透明的背景,而另外半边正常配色。这样我就可以实现背景的局部透明。这时候再去操作内部元素,我就不用傻乎乎的沿着需要镶嵌的边切割两次了,卡片标题还能跟随标题文字长度做简单的自适应。
还有就是clip-path切割后边框线被切掉和难以做光晕的问题,我通过调整border-radius,让每个角度根据对应的折角进行适当圆角,然后通过box-shadow的inset效果做成内部光晕。效果还不错。
- 2023年1月17日补充
最近又找到了新的解决办法,有选择的情况下,不再切割正文版块,而是使用正文版块的before伪类或者after伪类作为背景版块。这样随便怎么切割,怎么应用translate变换都不会影响到正文版块的内容和定位。

Use this card to join the candyhome and participate in a pleasant discussion together .
Welcome to 测试's candyhome,wish you a nice day .


